OctoPrint - changing WiFi AP
- Plug an Ethernet wire into the RaspberryPi (hearafter RPi), and power it up.
- Skip down to the section below headed "Configuring WiFi" and follow the instructions down as far as, but not including the NB heading, and come back here.
- you are going to reboot now - type sudo reboot now, and as soon as it starts to shutdown pull out the ethernet cable and wait (perhaps 2 mins) while your DNS allocates a new IP address, and octopi.local get's reassigned to this new address.
- You can check all is well by clicking here -> http:/octopi.local.
- DONE!
OctoPrint - revised installation instructions
Octoprint is a server that runs on a RPi. One can install Raspian (RPi OS) and then use it to install OctoPrint. This has the advantage that you have a RPi desktop environment for various fiddling later on. However, then you suck up a lot of space and processor cycles, and there is more to go wrong. The simplest installation has a simple CLI and the OctoPrint system only. That's the approach I used.
Useful Links
https://manual.prusa3d.com/Guide/1.+Printer+disassembly/586?lang=en
You should now be able to login remotely to the RPi. It seems to take a few minutes before the system is setup and registers itself with the DNS as octopi.local. If you get impatient then you'll have to root around in your router to find out its IP address.
Preparing the uSD card
- My initial starting point: http://diy3dtech.com/octopi-and-octoprint-project/
I used an RPi 3B+. There are RPi 4s on the market but they don't seem to be quite patted down yet. The software runs from a uSD card. So the task is to use a PC (or equivalent) to install and configure a system on a uSD card. 8Gb is the minimum size recommended, but of course bigger is better. I went with a SanDisk 32Gb card. The card should not need formatting!
The normal RPi setup involves dragging and dropping a bunch of files from the Raspian release onto the card. Forget that! The OctoPrint setup is different. A freeware program called Etcher is used to create a disk image directly.
- Download Etcher tool to your PC to flash the uSD card: https://etcher.io/
- Download the latest version of OctoPi from: https://octopi.octoprint.org/latest
- Use Etcher to copy the image to the SD card (can use .zip directly)

- This took 7-8 minutes on my creaky old laptop to write and then validate the write. When it finished the PC suggests that the card needs formatting. Resist the urge to comply, or you will be sorry. Just eject the card.

Configure the rest on RPi
- A word of warning here... Don't ever insert/remove the card when the RPi has power or you will be sorry.
- Plug an ethernet cable into the RPi
- Put the SD card in RPi and power it up.
Configuring WiFi
If you don't care about WiFi, i.e. you are always going to have your RPi connected to an ethernet wire then you can skip this section.
- Suggest you use putty to ssh to octopi.local credentials: pi/raspberry

- when logged in, type the following commands:

cd /boot
ls
sudo nano octopi-wpa-supplicant.txt
- Use the arrow keys to scroll down to the line that says "## WPA/WPA2 secured"
- Using your considerable experience using screen editors change the following lines to look like this:
# WPA/WPA2 securednetwork={
ssid="put your SSID here"
psk="put your WiFi password here"
}
- Control-O, followed by '<cr>' to write out the changed file
- Control-X will exit nano

Editing the file using the RaspberryPi nano screen editor

N.B.
This would be a great time to skip ahead and take care of another small edit that may be required if you want to install octolapse. Look for the sub-heading below ** Subroutine: Some more putty work **
- Now reboot the RPi using the command
sudo reboot now
- Now unplug the ethernet wire and see if you can connect to the RPi again. It may be a minute or two before your router is ready. This time you can use the browser to connect.
Configuring OctoPi
- Go to http://octopi.local. You should see the "setup wizard".
- Follow the setup instructions
- I disabled access control, but I changed my password to something short 'p' :-)
- I enabled anonymous usage reporting
- Enable connectivity check
- Enable plugin blacklist processing
- Skipped the Cura profile
- Set up the printer profile: General and Build Volume
Prusa i3 (original)MK2.5rectangularlower leftyes250mm210mm200mmX: 0/250, Y: -4/210, Z: 0/200 6000 mm/min 6000 mm/min 200 mm/min 300 mm/min 0.4 mm1
- Finish and Reload interface
- Check in top left of Web Interface to see if any Updates are offered, and presumably accept them.

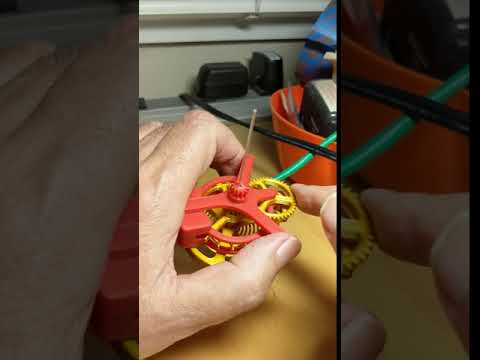
Setting up OctoLapse
https://www.youtube.com/watch?v=CjOIxKxb3h8 GREAT VIDEO!
- This may not be required if video streamer working already
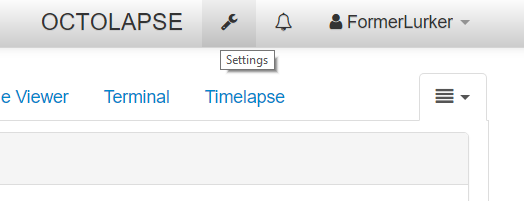
sudo git clone https://github.com/FFmpeg/FFmpeg.git - Open and sign into Octoprint.
- Click the settings icon (wrench icon)at the top of the page.
- Select the 'Plugin Manager' link on the left side of the settings popup.
- Click on the 'Get More...' button towards the bottom of the Plugin Manager page.
- Type 'octolaps' (without the 'e) into the search box and click 'Intall' when the Octolapse plugin appears.


- After installation is complete, follow the prompts to restart Octoprint.
- After OctoPrint reloads clear your browser's cache (instructions vary by browser, but typically pressing ctrl+f5 will work).
- OctoPrint Settings (spanner)/Octolapse/Main/Edit Main Settings scroll down to "Snapshot time" and untick it. Save, and get back to the OctoLapse Main Menu
- Select your printer from the printer dialog


Now the tedious bit
Click on the gear next to the Printer Profile


Now get the Slic3r up beside the Octolapse window so it's easy to copy stuff across.
Get the Printer tab visible in the slic3r on the left.
Copy the extruder parameters across to Octolapse.
Set the Snapshot Command to G4 P1

Get the Printer tab visible in the slic3r on the left.
Copy the extruder parameters across to Octolapse.
 |
| Octolapse/Printer/Extruder on the left - Slic3r/PrintER Settings/Extruder 1 on the right
Now switch the slic3r to the Print tab.
Copy the Print Move parameters in from the slic3r/Print Settings tab/Speed

Octolapse/Printer/Speed for Print Moves on the left - Slic3r/Print Settings/Speed on right
Now scroll down to the Miscellaneous Settings
|


Now we have to tell it the output speed of the video. I'm not sure if there is always one snapshot per frame in the output. They suggest 40 fps, but 15fps seems a more sedate pace, and it can be speeded up with post processing if required.

Setting up the Camera
Still in Octolapse Settings...

Click on the gear and then notice this setting:

Here's what I see:

This is the place we focus on to get the camera set up for the run.
** Subroutine: Some more putty work **
Before doing anything else go back to the PuTTY remote shell connected to octopi.local. Login and use cd to the /boot directory.cd /boot
sudo nano octopi.txt
scroll down to the end of the file and make these changes. There is a permission issue if you don't do this before the next bit.

<End of "PuTTY work", return from subroutine!>
The most important parameter is the Snapshot Delay. This delay allows the who rig to stop shaking around before the picture is taken. Shorter durations may be OK.

Now we need to set up the exposure parameters etc. Scroll down to the bottom and check the box.

So now you should try to get the camera image alongside the Octolapse page so that you can tweak the camera parameters and see the result in the video stream.
 |
| Octolapse on the left and real-time video view on the right |
JPEG to 100 is good.
Always turn autofocus OFF and adjust it in the box below
Here's some parameters that worked for the image below:


Before trying to make a time-lapse and wasting a lot of plastic, try to debug your settings first.

Make sure to turn OFF the reguslar timelapseNow you can switch to

Other Useful Plugins
Bed Visualizer
This is a plugin that shows a graph of how level the bed is. It is called Bed Visualizer. Just install it in the same way as OctoLapse.
 |
| Bed level visualizer |
OctoPrint-EmergencyStop
 |
| The emergency stop button |
M112 is the code you need! THis will stop the print and disconnect the printer lickety-split.
OctoPrint-TabOrder
Lets you alter the order of the tabs at the top of octoprint. It does work, but it seems not to work immediately and ignores some settings until you do something else that I have not yet figured out. Oh... figured it out. Uninstall, and re-install Themeify if you have already installed that plugin.
OctoPrint-TempBar
Can't make it work!OctoPrint-FloatingNavbar
https://github.com/jneilliii/OctoPrint-FloatingNavbar/archive/master.zip
Another no go! Shame because it would be useful.
Another no go! Shame because it would be useful.
MQTT Publish
To be figured out.WebCamTab
This is worth the effort! Puts a full res, full rate streaming webcam into it's own tab so it's easier to get to.
Themeify - note this is installed last!
This one seems to impact other installations, so it is out of alphabetical order, and last! These settings are required to make the window wider so that you can accommodate more tabs like this. See settings below in gray panel.
 |
| Full width OctoPrint Window |
 |
| Settings to set up above Octoprint window config |


For example, if you already have an existing player account at an operator that's providing a free spins welcome bonus, you won’t ready to|be capable of|have the flexibility to} declare this deal. At this point, the most effective thing to 까모벳 do is to get cashback out of your bets that you simply made during the week. This is a gift from the web establishment that can permit you to gather compensation for your losses and use it for further winnings. You don't should wager 5%, and the opposite 5% will require you to roll the quantity x25 times. There is no different bonus available immediately after creating an account.
ReplyDeleteAlmost each on-line casino offers various forms of bonuses to players who're new and players who're loyal. This isn't a separate sort of 카지노사이트 free spins bonus based mostly on the value of every spin. Getting Cash Spins means that does not matter what} slot they apply to, no matter you win from your spins is paid out in money and not as bonus cash. When it comes to the biggest bonus offers on the slots, Cafe Casino is most certainly well positioned atop the pile as probably the greatest new on-line casinos. Some of the promotions available for newcomers include a 350% welcome bonus and a 100 percent reload bonus for present users.
ReplyDelete